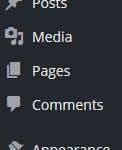
If you aspire to be a WordPress webdesigner or developer then you will need to create pages from scratch. From the WordPress dashboard main menu choose “Pages” to edit or create a new WordPress webpage. You should then see the pages menu:
From here you can edit the web pages if, of course, you have any. You can also add your new web page here.
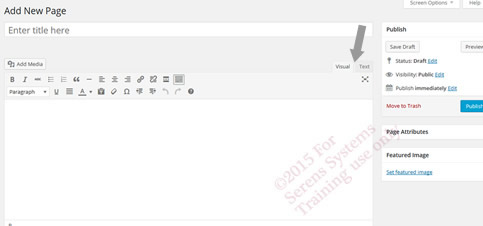
Click add new, from the pages menu and a blank webpage entry screen will be added. A simple editor appears that will allow you to work in a similar, but limited manner, to MS Word or MS Outlook.
If you see:

Find the two tabs to the left of the “Publish” panel (see below) If the “Visual” tab is grey then you are working in text mode which is great if you are an HTML junkie. However on the left there is a tab that says “Visual” click on it it wil lighten and the “Text” tab will grey out:
 Ok, so you can simply use this as you would a word processor to edit your webpages.
- WARNING: If you only see one row of editing icons, click on the right most one to add the lower row that you can see above.
- To save your work simply click on “publish” button in the right-hand publish section panel . The webpage will be inserted into the menu and appear on your website. You may need to tidy the menu up later.
- If you don’t want it to go live immediately then simply “save as draft” in the right-hand PUBLISH panel. There is also an option to here make the page private or password protect. (See the entry Visibility: Public EDIT)
NOTE: The text that appears on the website menu to view this webpage will be what you enter in the ‘Title Box.’ This is the box with the words “Enter title here.” Try and give the title a meaningful name for the webpage preferably using your chosen search engine optimisation (SEO) keywords for this webpage.
Viewers Posting/Comment entry on your webpage
The default situation is that all webpages have the feature that allows a viewer to post a comment. This will look a little silly on webpages like your contact page. If you do not want any blogging and have simply a website full of static webpages then you need to make sure no pages have the ability to post comments/posts. The way to switch commenting off is easy, but “buried,” because WordPress is tidy and does not like clutter.
TIP…. Switching off commenting/posting for a webpage.
-
The screen options are not usually visable in a new installation of WordPress. While creating your new webpage or editing a page, look at the top left of the EDIT PAGE screen for Screen Options and click on it.
-
Now tick the Discussion box.
This will cause the Discussion Panel to open further down the screen. You may see more options or different ones depending on the WordPress version you are using. -
Untick the Allow comments box in the Discussion Panel as seen below. If you always want these boxes unclicked as the default check out this post on “Webpage discussion defaults” on my website.
Right hand column
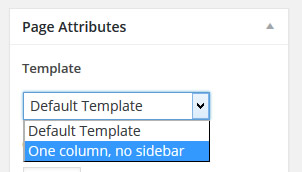
TIP…. If you only want one one column on your web page and therefore more room for your content choose “one column, no sidebar”. This feature is Theme and design dependent as to what you will see on your website.
To remove the right hand column on your web page – the one with the various choices such as Log out Entries RSS Comments RSS etc then:
Click on “Page Attribute” on the EDIT PAGE screen and select one column
“Fear Not..” If you simply want a non blogging, standard web site layout this should always be done to each page on creation. You’ll probably keep forgetting to do it, but you can go back and edit the page at anytime to remove the comment/post feature. You can set the default setting for discussion in the Website settings options
Viewing before publishing
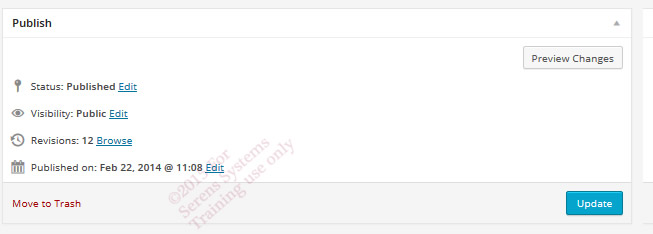
The “View Page” button above and “Preview changes” in the Publish module below allows you to see how it looks. These buttons open in a new window which you close when you’ve finished pre-viewing the changes – don’t forget to press the update button – see below.
Publishing your changes if you edit your pages.
To finish editing and update your web site, scroll up to the Publish panel which is underneath the editor you have just been using and click on the blue “Update” button. Note you can hide pages using “Visibility” or browse and select/go back to earlier revisions of your web page here.
WARNING if you do not see the “Update” button click on that tiny triangle to the far right of the heading “Publish” above the “Preview Changes” button
Prev – 06 Differences between Pages and Posts Next – 08 Images
Prefer to be tutored?
Why not try one of our one to one sessions or timtabled courses? From £120 per day at your site…
Where?
WordPress training course can be supplied nationwide individually or as a bespoke course for a group.
South West Midlands: Worcester, Hereford, Tewksbury, Gloucester, Cheltenham, Lydney, Coleford, Newent, Ross-on-wye, Ledbury, Malvern, Evesham
South Wales: Abergavenny, Cwmbran, Pontypool, Caldicot, Penarth, Barry, Llantrisant, Caerphilly, Monmouth, Cardiff, Newport, Chepstow
South West: Exeter, Plymouth, Okehampton, Bodmin, Tavistock, Truro, Newton Abbot, Torquay, Totnes


